Monday, October 22, 2012

Spinach and Cheese Casserole

So, this isn't really a casserole (I don't even know what a casserole actually consists of), but ever since I can remember my grandmother has called this baked ziti dish "casserole".  I didn't really care what she called it when she made it though, because baked pasta is an absolute favorite of mine!

Normally, she just uses ricotta, mozzarella, and pasta as the main ingredients, but I decided to add some spinach in because I love it (and I also had some left over in the freezer).


Ingredients

1 small pack frozen spinach (thawed)
1 box pasta of your choice (I used penne)
1 small carton of fat free ricotta
about 6 slices of part skim mozzarella
olive oil
salt
pepper

Preheat oven to 400 degrees F

Bring a pot of water to boil to cook the pasta in (add salt obviously).  Cook just under al dente.  In a baking dish, drizzle some olive oil to coat the dish to prevent the pasta from sticking.

In a large bowl combine the spinach, ricotta, cooked pasta, and a dash of pepper.  You can use more salt at your discretion, I used just a bit to salt the spinach and ricotta.  Mix together then transfer into the baking dish.  Drizzle with more oil (as it serves as a kind of make-shift sauce) and place the slices of mozzarella on top. Bake in the over for about 15-20 minutes or until the cheese has melted and started to crisp.

Enjoy!!


Sunday, August 5, 2012

Stay in Chinese Food: Orange Teriyaki Chicken and Fried Rice

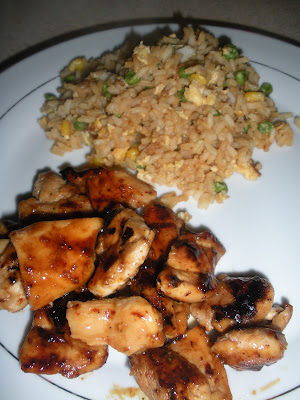
Hey everyone!  I love chinese food but even if it's usually super cheap, I just can't afford it whenever I want it on a college budget.  SOO I found these recipes that are almost as good as the real thing.  On the menu:  Orange Teriyaki Chicken with Fried Rice.


And here's how to make it!! 

Orange Teriyaki Chicken Recipe

Ingredients

2 tablespoons olive oil
1/2 tablespoon ginger
1 tablespoon orange zest
1 garlic clove, minced
1/4 cup rice vinegar
3 tablespoons soy sauce
2 tablespoons sugar
2 tablespoons orange marmalade
1 tablespoon freshly squeezed orange juice
1 tablespoon honey
pinch of red pepper flakes
1 1/4 lb boneless, skinless chicken thighs, cut into bite sized pieces

Sauce:  over medium heat, add the olive oil.  Next add the ginger, orange zest, and garlic.  The original recipe calls for fresh ginger, but I didn't have any on hand so I just used ground ginger from a container.  If you do this too, make sure you use less than what the original recipe says, otherwise it'll have too strong a ginger taste. 

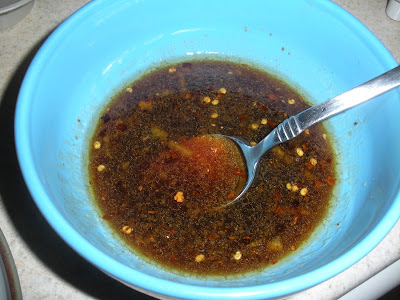
Cook for about 1-2 minutes while stirring.  Add the rice vinegar, soy sauce, sugar, orange marmalade, orange juice, honey, and pepper flakes.  I didn't really measure out a pinch for that either. I just sprinkled until I thought it was spicy enough.  Bring to a simmer and allow to simmer for about 5 minutes to thicken the sauce.  Separate half of the sauce into another bowl to serve with cooked chicken.

Here's what the sauce looked like when done:


Unfortunately, I don't have a grill... so I settled for the good old George Foreman counter grill haha.  


Place the chicken on the grill and brush the sauce once the pieces have started to cook, turning over every few minutes.  I added more sauce every time I turned the pieces also, trying to get them extra yummy.  Depending on how thick the pieces are, they should take about 5 minutes.

Here they are finished:


Fried Rice Recipe 

Ingredients (mine were lacking from the original recipe because I didn't have some ingredients)
3 cups cooked white rice (translates to 1 cup uncooked rice)
3 tbs sesame oil
1 cup frozen peas and corn (defrosted)
2 tsp minced garlic
2 eggs, slightly beaten
1/4 cup soy sauce
 
On medium-high heat, heat the sesame oil in a large pan.  Add the vegetables and garlic and fry until tender.  
 

Lower the heat to about medium and add the eggs.  


Scramble the eggs until cooked


Add the rice and soy sauce and mix together well.  Keep this on the fire until it is thoroughly heated.


Next time I make this rice, I'll edit to include everything else I use... bean sprouts and baby corn perhaps?  Those are my favorites!


Wednesday, August 1, 2012

Update and Sopapilla Cheesecake

Happy first day of August!! I've been a flake again, I apologize.... but not to worry! I've made lots of things so expect to see several updates coming from me this week!

First order of business, do you like my new background/banner?! I did it last night when I should have been working on my paper, but I found the background and just needed to change it right then.  It's not pink, but I still really like it.  Damask is one of my favorite patterns!

Second, has anyone been watching the Olympics? Because I have been watching them like it's my job.  I teared up twice yesterday when I watched the fab five won gold, once live in the morning and again in the evening for the rerun.  Oh and again when the Brits won their first gold by the rowing girls.  Good grief.

Now on to the dessert....

Quite possibly the easiest adaptation of cheesecake ever created: the Sopapilla Cheesecake!  yum yum just look at those, I wish I still had some!

Ingredients
2 cans of Pillsbury crescent rolls
2 8oz Neufchâtel cheese, softened
1 cup sugar
1 teaspoon vanilla
1/4 cup butter
Cinnamon and sugar, to sprinkle

Preheat to 350 degrees F

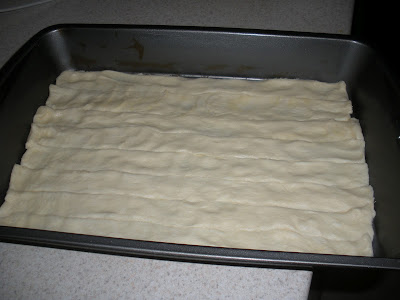
I bought the rolls that came out in strips, so what I did was stretched the strips out both length and width wise of one can of rolls and pressed them together (as to not leave any gaps between strips) on to an ungreased pan.  I couldn't tell you what the exact measurements of this pan are but my guess is 9x13.  Then, combine the cheese, sugar, and vanilla in a separate bowl.  

I used Neufchâtel cheese because it's 1/3 less the fat of regular cream cheese, but when I was in the store the other day I noticed that the reduced fat cream cheese is 1/2 the fat. So next time I'm just going to used the low fat cream cheese, you could use either though.  Neufchâtel cheese tastes almost exactly the same as cream cheese and no one noticed when I served them this cheesecake ;)


 Spread the mixture over the over the dough strips


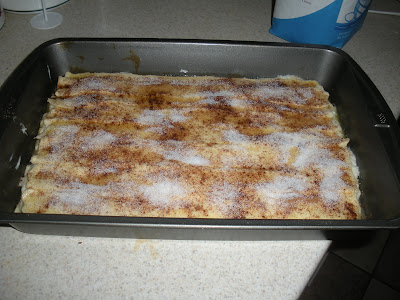
Unroll the second can of crescent rolls over the cream cheese mixture using the same procedure to stretch it out as before.  Melt the bit of butter and spread over top and sprinkle cinnamon and sugar.  I didn't do this part by measurement, just sprinkled what I thought was enough.  It looks like a lot of sugar in the before photo but it came out perfect.


Bake at 350 degree F for 20-30 minutes.  You can also tell when it looks done.  The dough looks cripsy and not squishy like before.  I must tell you that this smelled absolutely irresistible.  Even while it was in the oven, I wish my house smelled like these all day long.


Original Recipe

Sunday, July 15, 2012

Zucchini Bread

This past Friday afternoon, a lady that lives down my street brought my grandmother these giant zucchinis growing in her yard.  At this point, my grandmother had about 6 zucchinis already in the fridge, some from our neighbor and some from our garden.  And as nice as the gesture was, she didn't know what to do with all of these zucchinis!  Especially since she had already made zucchini soup this week!

So yesterday morning I was looking through my recipe binder, that contains all sorts of recipes from all sorts of people, and found one from my aunt for zucchini bread.  Thus begins the making of zucchini bread with my grandmother.  And the best part about this is.... one slice is LESS than 100 calories!! As long as you don't consider half of the loaf as 1 slice that is... and after trying the bread it might actually come to that!

Ingredients

3 cups shredded zucchini
1 2/3 cups sugar
2/3 cup olive oil (I ALWAYS, ALWAYS use olive oil, except for cookies- then butter is acceptable), but regular- not extra virgin
2 teaspoons vanilla
4 eggs
3 cups all purpose flour
2 teaspoons baking soda
1 teaspoon salt
1 teaspoon ground cinnamon
1/2 teaspoon ground cloves (I didn't have cloves so I left it out- it's such a small amount anyway)
1/2 teaspoon baking powder
1/2 chopped nuts (or chocolate chips if you desire, like me, and I probably added about 1 1/2 cups hehe)

Preheat the oven to 350 degrees F and grease the bottom of two loaf pans (9x5x3 roughly).

Shred the zucchini, my grandmother peeled off the skin and used a cheese grater (and take our the seeds as well of course). PS. LOOK at the SIZE of that zucchini!! It's larger than our toaster!!

 Three cups for us what a little less than one large zucchini, the one we used was slightly smaller than the one pictured above.  But if I had to guess I would say 3 cups is about 2-3 medium sized zucchini.
 
 In a large bowl, mix the zucchini, sugar, oil, vanilla, and eggs until well combined.  I didn't even beat the eggs before putting them in the bowl... just add it allll in
 Here's what it looked like after all the wet + sugar additions:
 Then in a smaller bowl add the flour, baking soda, baking powder, salt, cinnamon and mix with fork or whisk until well combined and add to the wet mixture.
 Now it's time to add in the yummy chocolate chips!  I used semi-sweet by the way.
 Pour the batter into the pans and bake 50 to 60 minutes- mine were in for about 60 minutes until the toothpick came out clean.  When they're done remove from oven and cool for about 10-20 minutes then loosen from the pans and remove.  Allow the bread to cool completely before digging in!
 It was still breakfast time so I enjoyed a slice of mine with some freshly cut strawberries!


Saturday, July 14, 2012

Roasted Red Pepper and Goat Cheese Pasta

I found this recipe online and have been waiting to try it out because it sounded so delicious.  Mostly because I love peppers, goat cheese, and pasta.  Not only that but it was really easy to make.

Some tips before you get started though (I'll definitely be keeping these in mind next time I make it though... lessons learned haha):  don't start the cream sauce until after the red peppers are roasted and cooling down- maybe even wait until you have them peeled and cleaned.  Make sure you get FAT FREE half and half (I couldn't find a small container of it in the supermarket so I just got regular.  But it will definitely be easier on your waistline).  Time the cooking of the pasta right when you're done blending the sauce so you can pour it in without the pasta sticking together (I used linguine fine and it was done in 6 minutes).

Ingredients

2 whole red bell peppers
2 tablespoons olive oil
1 small onion, diced
2 cloves garlic, minced
1 cup fat free half & half
about 4 oz. herb goat cheese (if you can't find the small package)
2/3 cup grated parigiano reggiano cheese
1 lb linguine, cooked to al dente
salt & pepper, to taste
handful of parsley (optional)

Here's what you do:

Preheat the oven to 500 degree F, put foil on a baking sheet, place peppers on sheet, and bake for 30 minutes.  Remove and let cool for about 10 or until you can handle peeling the skin off without burning your fingers off.


Then start the sauce by chopping the onions and garlic and saute in olive oil until tender.
 Add the half and half, goat cheese, salt, pepper, and parm, stir until cheese is melted over low heat.
 Pepper should be peeled and seedless and cut into strips.  Add them to the sauce as well. 
 Remove from heat and blend together.  I don't have a food processor so I just used a regular ol'blender.  Put back into the pan to keep warm until pasta is done.
 Add pasta to the sauce and coat thoroughly.  Add some more parm cheese and parsley if you desire, like me! 
 Enjoy!!


Friday, June 29, 2012

Peanut Butter Chocolate No Bake Dessert

I'm not even sure what do call this dessert but it is delicious!  I also love that it was no bake- perfect for a hot summer day and you're looking for something sweet to eat.  Unfortunately someone dug into it before I did, attempted to make it look like they didn't, and put it back in the fridge.  But, I guess a good thing about this picture is that you can see the layers of the dessert.
Ingredients

  • 1 package of Oreos, or any other kind of cream-filled sandwich cookies
  • 2 tbs of softened butter
  • 1 package (8 oz) of cream cheese, softened
  • 1/2 cup peanut butter
  • 1-1/2 cups confectioners sugar
  • 16 oz of frozen whipped topping
  • 15-20 mini peanut butter cups
  • 1 cup milk
  • 1 small package of instant chocolate pudding mix 

Procedure

Crush about 20 cookies and toss together with the softened butter.  Press into a 9x9 dish (mine was slightly larger) to form a sort of 'crust'.  In a separate large bowl, beat the cream cheese, peanut butter, and 1 cup of the confectioners sugar until smooth.  Fold in half of the whipped topping and spread over the crust.  Chop up the mini peanut butter cups and sprinkle over top of the peanut butter and cream cheese layer.

In another large bowl, beat milk, pudding mix, and the rest of the confectioners sugar on low for 2 minutes.  Let stand for 2 minutes and fold in the remaining whipped topping.  Spread over the mini peanut butter cups.  Crush the rest of the cookies and sprinkle on top- if you have any left over peanut butter cups sprinkle those as well.  Cover and chill for at least 3 hours before you dig in!  Also, as if this dessert couldn't get any better, it tasted even better the following night.  There's just one thing that I would change next time I make it would be the amount of peanut butter.  It was just a littlleeee too thick and I think the peanut butter was to blame.  Other than that, enjoy!!

Link to original recipe here

Wednesday, June 27, 2012

Mustard Roasted Salmon with Zucchini Chips

So, here's the first official food post:

I was craving salmon the other night, which is strange because I'm not much of a fish eater.  But nonetheless, I gave into my craving and searched for different salmon recipes.  I found a couple, but there was only one that used simple ingredients and still looked good.

So I went out and bought a pound wild Alaskan salmon and this was the result:


I also apologize for the picture, I realize it's not the best photo.  The salmon also broke when I took it out of the pan, I was quite upset.

But to make up for my terrible picture taking skills (which I promise will get better) here was how I made it:

Ingredients

  • 1 lb of salmon (I guess you could use whatever salmon you'd like- I got wild Alaskan)
  • about 2 tbs of mustard (I used a smooth Dijon)
  • about 2 tbs of maple syrup (real maple syrup that is)
  • about one clove of garlic (I used the already finely chopped one in the jar)
  • 1/2 freshly squeezed lemon juice
  • salt and pepper
Preparations

Preheat your oven to 400 degrees Fahrenheit.  I lined my baking sheet with aluminum foil, which may have aided in the process of breaking my salmon, next time I'll grease it with a bit of olive oil.  Season the salmon with salt and pepper and pop it in the oven for 10 minutes.

While the salmon is cooking combine the mustard, maple syrup, garlic, and lemon juice and mix well.  After the ten minutes are up, put the mixture on the salmon and continue to bake for another 10 minutes.  The original recipe called for only 5 minutes, but I took user's comments seriously and used the extra 5 minutes in the oven.

Besides maybe salting the salmon a little too much, I was pretty happy with the way it turned out.  I didn't actually use a measuring spoon for the ingredients, just a soup spoon.  But regardless, it had a nice tangy-sweet flavor and was cooked perfectly.  If I hadn't done the extra five minutes it would have been entirely too wet and anymore would most likely have dried it out.

The side dish I made to go along with it (in addition to brown rice) were these very yummy zucchini chips.  I love zucchini anyway it's cooked, but these just looked too good to be true, so obviously I had to try it.


Ingredients

  • 2 medium sized zucchini, sliced (apparently they're called 'green squash' in the supermarkert- I had no idea)
  • 1/4 cup breadcrumbs (I just used plain)
  • 1/4 cup grated Parmesan cheese
  • 1/2 cup whole wheat flour 
  • 1 cup milk
Preparation

Since my oven was already heated to 400 degrees, I just kept it at that (I even had them in there while the salmon was cooking).  I lined another baking sheet with aluminum foil, which turned out to be another lesson of having to grease beforehand.

Anyway, so after washing and slicing the zucchini, mix together the milk and flour in a large bowl (I actually thought this was too much and ended up throwing most of it away- next time I'll cut them down) and mix the breadcrumbs and cheese together in a separate bowl.  Dredge the slices of zucchini through the flour and milk mixture then coat them evenly in the breadcrumb and cheese mixture.  Place them on the baking sheet and bake for 30 minutes.  The chips are supposed to be turned over halfway through baking, but I couldn't since they were sticking, although they still turned out browned and crispy.


So, that's what I made for dinner and overall I was pretty happy with all of it.  Here are the links to the original recipes if you're interested:

Zucchini Chips
Mustard Roasted Salmon

Can't believe I'm actually doing this...

I've been thinking about making a food blog for a while, but for some reason I never got around to it until now! Perhaps the fact that it's summer and I'm currently unemployed is the reason.

I find a lot of recipes by either browsing the internet or watching the food network, some I am more eager to try than others.  But, eventually I'll get to them all and maybe with enough experience I'll start to make up some of my own!

I must also say that I enjoy doing other little crafty things, so occasionally when I complete various crafts, I'll be posting pictures of those as well.  I know the title of my blog doesn't exactly include that, but I'm not the most creative in that sense... in fact, I didn't even come up with the title! Credit goes to the lovely Kayla who also unintentionally gave me the push I needed to start this thing.  You can find her at Curly Cookin'.